微信小程序 template模板详解及实例
首先看一些官方的一些介绍。
模板:模板功能是通过对template 标签的属性 name=”” 去创建不同模板,通过is=”name的值”来使用。
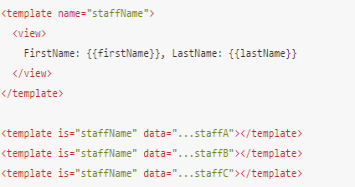
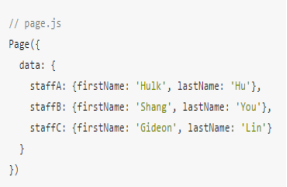
通过上面两张图,大概能看出,使用模板可以为大量类似的布局带来便利。下面看一下我自己的一个Demo.
先放出效果图(数据来自聚合数据)
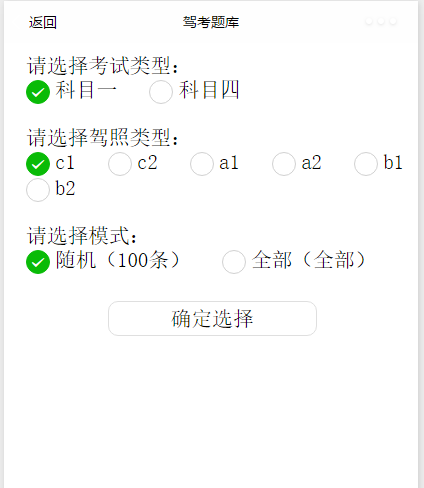
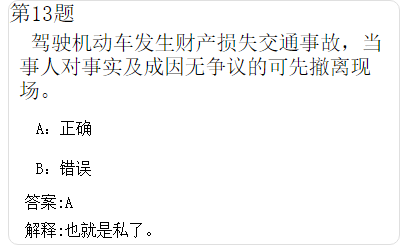
可以看到,除了选项个数的差别之外,其他布局是相同的。
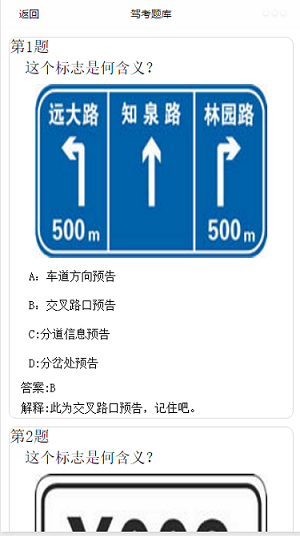
下面的每一道题的模板。
<template name="carItem">
 <view class="timu">
 <view class="title">第{{item.id}}题</view>
 <view class='question'>{{item.question}}</view>
 <view class="img" wx:if="{{item.url!=''}}"><image src="{{item.url}}" /></view>
 <view class='select'>A:{{item.item1}}</view>
 <view class='select'>B:{{item.item2}}</view>
 <view class='select' wx:if="{{item.item3!=''}}">C:{{item.item3}}</view>
 <view class='select' wx:if="{{item.item4!=''}}">D:{{item.item4}}</view>
 <view class='content'>答案:{{item.answer}}</view>
 <view class='content'>解释:{{item.explains}}</view>
 </view>
</template>
在我们上面的代码中,除了使用template标签定义模板外,还是用了条件渲染。例如当题目为判断题的时候。CD选项是没有数据的,所以就不能显示出来,我们可以通过if语句判断是否为空来决定显示与否。
下面放出代码。
CarUtils.js
/**
 * 网络请求
 */
function request(url, subject, model, testType, success, fail) {
 if (typeof success != 'function' || typeof fail != 'function') {
 return
 }
 wx.request({
 url: url,
 data: {
 key: "5f0c9315c43385f5baaa3f49b79caa8f",
 subject: subject,
 model: model,
 testType: testType,

 },
 success: function (res) {
 if (res.data.error_code == 0) {
 console.log("获取数据成功"),
 success(res.data)
 } else {
 wx.showModal({
 title: '提示',
 content: 'res.data.reason'+'请重新选择',
 success: function (res) {
 if (res.confirm) {
 console.log('用户点击确定')
 }
 }
 })
 console.log("失败原因" + res.data.reason)
 fail(res.data.reason)
 }
 },
 fail: function () {
 fail('网络出现问题')
 },
 })
}
function getanswer(url,success,fail){
 if( typeof success != 'function' || typeof fail != 'function' ) {
 return
 }
 wx.request({
 url:url,
 data: {
 key:"0794b823b484d6e1b4186d150834ae1b",
 },
 success: function(res){
 if( res.data.error_code == 0 ) {
 console.log("获取数据成功"),
 success( res.data )
 } else {
 console.log("失败原因"+res.data.reason)
 fail( res.data.reason )
 }
 },
 fail: function() {
 fail( '网络出现问题' )
 },
 })
}
module.exports = {
 request: request,
 getanswer:getanswer
}
template.wxml
<template name="carItem">
 <view class="timu">
 <view class="title">第{{item.id}}题</view>
 <view class='question'>{{item.question}}</view>
 <view class="img" wx:if="{{item.url!=''}}"><image src="{{item.url}}" /></view>
 <view class='select'>A:{{item.item1}}</view>
 <view class='select'>B:{{item.item2}}</view>
 <view class='select' wx:if="{{item.item3!=''}}">C:{{item.item3}}</view>
 <view class='select' wx:if="{{item.item4!=''}}">D:{{item.item4}}</view>
 <view class='content'>答案:{{item.answer}}</view>
 <view class='content'>解释:{{item.explains}}</view>
 </view>
</template>
选择界面 drivercar.js
Page({
 data:{
 subject: [
 {name: '1', value: '科目一',checked: 'true'},
 {name: '4', value: '科目四'},

 ],
 model: [
 {name: 'c1', value: 'c1',checked: 'true'},
 {name: 'c2', value: 'c2'},
 {name: 'a1', value: 'a1'},
 {name: 'a2', value: 'a2'},
 {name: 'b1', value: 'b1'},
 {name: 'b2', value: 'b2'},

 ],
 testType: [
 {name: 'rand', value: '随机(100条)',checked: 'true'},
 {name: 'order', value: '全部(全部)'},
 ],


 },
 onLoad:function(options){
 var that = this;
 that.setData({
 subject1:"1",
 model1:"c1",
 testType1:"rand"
 })
 },
 confirm(){
 var that=this;
 wx.navigateTo({
 url: 'detail/detail?subject='+that.data.subject1+'&model='+that.data.model1+'&testType='+that.data.testType1,
 });
 },
 confirm1(){
 var that=this;
 wx.navigateTo({
 url: 'detail_1/detail_1?subject='+that.data.subject1+'&model='+that.data.model1+'&testType='+that.data.testType1,
 });
 },
 //科目类型
 subjectChange(e){
 var that = this;
 console.log('科目类型:'+e.detail.value);
 that.setData({
 subject1:e.detail.value,

 })
 } ,
 //驾照类型
 modelChange(e){
 var that = this;
 console.log('驾照类型:'+e.detail.value);
 that.setData({
 model1:e.detail.value,
 })
 } ,
 //测试类型
 testTypeChange(e){
 var that = this;
 console.log('测试类型:'+e.detail.value);
 that.setData({
 testType1:e.detail.value,
 })
 } ,

})
选择界面drivercar.wxml
<view class="container">
<!--radio-->
 <view class="radio">
 <text>请选择考试类型:</text>
 <radio-group class="radio-group" bindchange="subjectChange">
 <label class="radio" wx:for="{{subject}}" wx:key="subject">
 <radio value="{{item.name}}" checked="{{item.checked}}"/>{{item.value}}
 </label>
 </radio-group>
 </view>
 <view class="radio">
 <text>请选择驾照类型:</text>
 <radio-group class="radio-group" bindchange="modelChange" >
 <label class="radio" wx:for="{{model}}" wx:key="model">
 <radio value="{{item.name}}" checked="{{item.checked}}"/>{{item.value}}
 </label>
 </radio-group>
 </view>
 <view class="radio">
 <text>请选择模式:</text>
 <radio-group class="radio-group" bindchange="testTypeChange" >
 <label class="radio" wx:for="{{testType}}" wx:key="testType">
 <radio value="{{item.name}}" checked="{{item.checked}}"/>{{item.value}}
 </label>
 </radio-group>
 </view>
 <!--button-->
 <text class="nav" bindtap="confirm">确定选择</text>
</view>
选择界面drivercar.wxss
.radio{ margin: 20rpx;}
.radio text{margin: 20rpx;}
.nav {
 border: 1px solid #DFDFDF;
 border-radius: 10px;
 text-align: center;
 width: 50%;
 float: left;
 height: 60rpx;
 line-height: 60rpx;
 margin-bottom:30rpx;
 margin-top: 30rpx;
 margin-left:25%;
 margin-right:25%;

}
题目界面detail.js
var util = require('../../../../Utils/CarUtils.js')
var url = 'http://api2.juheapi.com/jztk/query'
var answerurl = "http://api2.juheapi.com/jztk/answers"
Page({
 data: {
 loadingHide: false,
 ResList: {
 "error_code": 0,
 "reason": "success",
 "result": {
 1: "A",
 2: "B",
 3: "C",
 4: "D",
 7: "AB",
 8: "AC",
 9: "AD",
 10: "BC",
 11: "BD",
 12: "CD",
 13: "ABC",
 14: "ABD",
 15: "ACD",
 16: "BCD",
 17: "ABCD"
 }
 },
 },
 onLoad: function (options) {

 var that = this
 var z=1;
 var mTimuLIs={}
 util.request(url, options.subject, options.model, options.testType, function (dataJson) {
 console.log(options.model + "model");
 console.log(options.testType + "testType");
 console.log(options.subject + "subject");
 console.log("请求成功00");

 mTimuLIs=dataJson["result"];
 console.log(mTimuLIs.length);
 for (var i = 0; i < mTimuLIs.length; i++) {

 //console.log(that.data.ResList.result[1]);
 var y= parseInt(mTimuLIs[i].answer);
 //console.log(y);
 mTimuLIs[i].answer = that.data.ResList.result[y];
 mTimuLIs[i].id=parseInt(i+z);
 // console.log(that.data.ResList.result[y]);
 }
 that.setData({
 mTimuLIs: mTimuLIs,
 loadingHide: true
 })
 },
 function (reason) {
 console.log(reason);
 that.setData({
 loadingHide: true
 })
 })
 },
})
题目界面 detail.wxml
<import src="../../../../common/templet.wxml"/>
<scroll-view scroll-y="true" class="page-body" >
 <template is="carItem" data="{{item}}" wx:for="{{mTimuLIs}}" wx:key="TimuList"/>
</scroll-view>
<loading hidden="{{loadingHide}}">
 加载中...
</loading>
全局样式 app.wxss
.container {
 height:100%;
 flex: 1;
 display: flex;
 flex-direction: column;
 box-sizing: border-box;
 background-size: 100%;
}
.item-view{
 padding: 10px;
 display: flex;
 flex-direction: column;
 border-top: 1px solid #DEDEDE;
 border-left: 1px solid #DEDEDE;
 box-shadow: 2px 2px 2px #C7C7C7;
 margin: 10px;
 border-radius: 5px;
}

.item-view .content{color: black;}
.item-view .date{ color: grey;margin-top: 10px;}
.item-view image{width: 100%;height: 400rpx;margin-top: 10rpx;}
.loading-view{display: flex;flex-direction: row; justify-content: center;align-items: center;padding: 10px;}


.timu{border: 1px solid #DFDFDF;margin: 20rpx;border-radius: 10px;}
.timu .title{font-size: 40rpx; }
.timu .question{text-indent: 20rpx;margin-left: 10rpx; padding: 10rpx;}
.timu .img{width: 100%;display:flex;flex-direction: column;align-items: center;margin: 0 auto;padding-top: 10rpx;padding-bottom: 10rpx;}
.timu .content{font-size: 30rpx;padding: 10rpx;margin-left: 20rpx }
.timu .select{font-size: 30rpx;margin-left: 30rpx;margin-right: 30rpx; padding: 20rpx; }
感谢阅读,希望能帮助到大家,谢谢大家对本站的支持!