组件通信
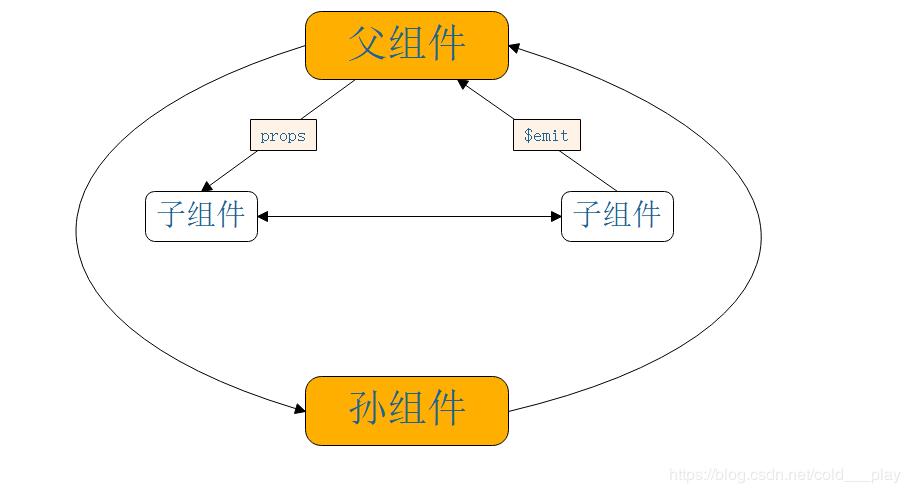
从父组件向子组件通信,通过props传递数据就可以了,但Vue组件通信的场景不止有这一种,归纳起来,组件之间的通信可以用下图来表示:

自定义事件
当子组件需要向父组件传递数据时,就要用到自定义事件。子组件用**$ emit()来触发事件**,父组件用**$ on()**来监听子组件的事件。
父组件也可以直接在子组件的自定义标签上使用v-on来监听子组件触发的事件。
<!DOCTYPE html>
<html lang="en">
<head>
 <meta charset="UTF-8">
 <meta name="viewport" content="width=device-width, initial-scale=1.0">
 <meta http-equiv="X-UA-Compatible" content="ie=edge">
 <script src="https://unpkg.com/vue/dist/vue.js"></script>
 <title>自定义事件</title>
</head>
<body>
 <div id="app">
 <p>总数:{{total}}</p>
 <my-component
 @increase="handleGetTotal"
 @reduce="handleGetTotal"></my-component>
 </div>
 <script>
 Vue.component('my-component',{
 template: '\
 <div>\
 <button @click="handleIncrease">+1</button>\
 <button @click="handleReduce">-1</button>\
 </div>',
 data: function () {
 return {
 counter: 0
 }
 },
 methods: {
 handleIncrease: function () {
 this.counter++;
 this.$emit('increase', this.counter);
 },
 handleReduce: function () {
 this.counter--;
 this.$emit('reduce', this.counter);
 }
 }
 });

 var app = new Vue({
 el: '#app',
 data: {
 total: 0
 },
 methods: {
 handleGetTotal: function (total) {
 this.total = total;
 }
 }
 });
 </script>
</body>
</html>
子组件有两个按钮,分别实现+1和-1的效果,在改变组件的data “counter”后,通过$emit()在把它传递给父组件,父组件使用v-on:increase和v-on:reduce监听事件。
$emit()方法的第一个参数是自定义事件的名称,后面的参数是要传递的数据,可以不填或者填写多个。
注意:除了用v-on在组件上监听自定义事件外,也可以监听DOM事件,这时候可以用 .native修饰符表示监听的是一个原生事件,监听的是该组件的根元素:
<my-component v-on:click.native="handleClick"></my-component>使用v-model
Vue 2.x 可以在自定义组件上使用v-model指令。
<!DOCTYPE html>
<html lang="en">
<head>
 <meta charset="UTF-8">
 <meta name="viewport" content="width=device-width, initial-scale=1.0">
 <meta http-equiv="X-UA-Compatible" content="ie=edge">
 <script src="https://unpkg.com/vue/dist/vue.js"></script>
 <title>使用v-model</title>
</head>
<body>
 <div id="app">
 <p>总数:{{total}}</p>
 <my-component v-model="total"></my-component>
 </div>
 <script>
 Vue.component('my-component',{
 template: '<button @click="handleClick">+1</button>',
 data: function () {
 return {
 counter: 0
 }
 },
 methods: {
 handleClick: function () {
 this.counter++;
 this.$emit('input',this.counter);
 }
 }
 });

 var app = new Vue({
 el: '#app',
 data: {
 total: 0
 }
 });
 </script>
</body>
</html>
仍然是点击按钮+1的效果,不过这次组件$emit()的事件是特殊的input,在使用组件的父级,并没有在<my-component>上使用@input=“handler”,而是使用了v-model板顶的一个数据total。这也可以称作是一个语法糖,因为上面的示例可以间接地用自定义事件来实现:
<div id="myApp">
 <p>总数:{{total}}</p>
 <my-component1 @input="handlegetTotal"></my-component1>
</div>
<script>
 Vue.component('my-component1',{
 template: '<button @click="handleClick">+1</button>',
 data: function () {
 return {
 counter: 0
 }
 },
 methods: {
 handleClick: function () {
 this.counter++;
 this.$emit('input',this.counter);
 }
 }
 });

 var myApp = new Vue({
 el: '#myApp',
 data: {
 total: 0
 },
 methods: {
 handlegetTotal: function (value) {
 this.total = value;
 }
 }
 });
</script>
v-model还可以用来创建自定义的表单输入组件,进行数据双向绑定:
<!DOCTYPE html>
<html lang="en">
<head>
 <meta charset="UTF-8">
 <meta name="viewport" content="width=device-width, initial-scale=1.0">
 <meta http-equiv="X-UA-Compatible" content="ie=edge">
 <script src="https://unpkg.com/vue/dist/vue.js"></script>
 <title>自定义表单输入组件</title>
</head>
<body>
 <div id="app">
 <p>总数:{{total}}</p>
 <my-component v-model="total"></my-component>
 <button @click="handleReduce">-1</button>
 </div>
 <script>
 Vue.component('my-component',{
 props: ['value'],
 template: '<input :value="value" @input="updateValue">',
 methods: {
 updateValue: function (event) {
 this.$emit('input', event.target.value);
 }
 }
 });

 var app = new Vue({
 el: '#app',
 data: {
 total: 0
 },
 methods: {
 handleReduce: function () {
 this.total--;
 }
 }
 });
 </script>
</body>
</html>
注意:实现这样一个具有双向绑定的v-model组件要满足下面的两个要求:
- 接受一个value属性
- 在有新的value时触发input事件
更多教程点击《Vue.js前端组件学习教程》,欢迎大家学习阅读。
关于vue.js组件的教程,请大家点击专题vue.js组件学习教程进行学习。
以上就是本文的全部内容,希望对大家的学习有所帮助,也希望大家多多支持脚本之家。