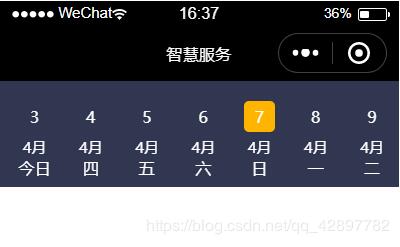
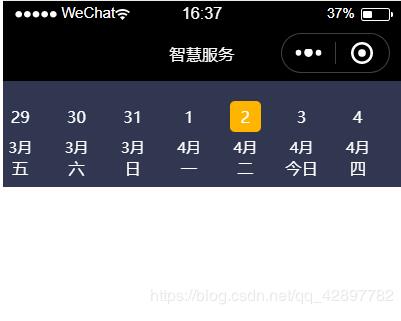
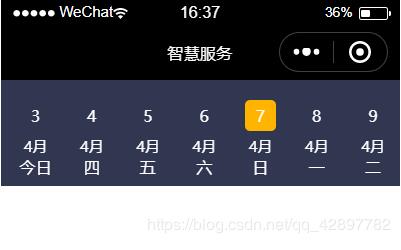
本文实例为大家分享了小程序日历左右滑动效果的具体代码,供大家参考,具体内容如下
效果图


wxml
<scroll-view class="scroll-view" scroll-left="{{scrollLeftIndex*itemWidth}}" scroll-x scroll-with-animation>
 <view class='item' style='width:{{itemWidth}}px' wx:for="{{dateList}}" data-index='{{index}}' bindtap='clickDate'>
 <view class='text-view'>
 <view class='day {{index==clickIndex?"day-active":""}}'>{{item.day}}</view>
 <text class='month'>{{item.month}}月</text>
 <view wx:if="{{item.month == sysmonth && item.day == nowDate}}">
 <text class='week'>今日</text>
 </view>
 <view wx:else>
 <text class='week'>{{item.week}}</text>
 </view>
 </view>
 </view>
</scroll-view>
js
// byjs_sun/pages/product/all/all.js
Page({

 /**
 * 页面的初始数据
 */
 data: {
 dateList:[], //存放日期的数组
 nowDate:'', //系统当前日期
 },
 // 格式化日期,时间
 formatTime(date) {
 const year = date.getFullYear()
 const month = date.getMonth() + 1
 const day = date.getDate()
 const hour = date.getHours()
 const minute = date.getMinutes()
 const second = date.getSeconds()
 return [year, month, day].map(this.formatNumber).join('/') + ' ' + [hour, minute, second].map(this.formatNumber).join(':')
 },
 // 格式化数字
 formatNumber(n) {
 n = n.toString()
 return n[1] ? n : '0' + n
 },

 // 获取日期详情
 getDateInfo(ts) {
 const date = new Date(ts);
 const weekArr = new Array("日", "一", "二", "三", "四", "五", "六");
 const week = date.getDay();
 let dateString = this.formatTime(date);
 let shortDateString = dateString.replace(/\//g, '-').substring(5, 10).replace(/-/g, '月') + "日";
 if (date.getDate() < 10) {
 shortDateString = shortDateString.replace(/0/g, '');
 }
 return {
 shortDateString,
 dateString,
 month: date.getMonth() + 1,
 day: date.getDate(),
 week: weekArr[week]
 }
 },

/**
 * 生命周期函数--监听页面加载
 */
 onLoad: function (options) {
 var that = this;
 var myDate = new Date(); //获取系统当前时间
 var sysmonth = myDate.getMonth() + 1
 var nowDate = myDate.getDate(); //当前是本月几日
 var today = myDate.toLocaleDateString(); //今日年月日
 that.setData({
 nowDate: nowDate,
 sysmonth: sysmonth
 }),
 console.log('系统日期:',myDate);
 console.log('系统日期(年/月/日):',today);
 console.log('系统日期(月):', sysmonth);
 console.log('系统日期(日):', nowDate);

 // 获取屏幕宽度,设置每个日期宽度
 wx.getSystemInfo({
 success: (res) => {
 console.log(res);
 this.setData({
 windowWidth: res.windowWidth,
 itemWidth: parseInt(res.windowWidth / 7)
 });
 },
 })
 this.initData();
 },

 // 初始化日期
 initData() {
 const nowDateTime = +new Date();
 let dateList = [];
 for (let i = -30; i < 30; i++) {
 let obj = this.getDateInfo(nowDateTime + i * 24 * 60 * 60 * 1000);
 obj.isChoose = i == 0;
 dateList.push(obj);
 }
 this.setData({
 dateList,
 clickIndex: 30,
 scrollLeftIndex: 30

 });
 },

 // 点击日期方法
 clickDate(e) {
 var that = this;
 console.log('点击日期携带的下标:', e.currentTarget.dataset.index); //当前的点击的日期
 var index = e.currentTarget.dataset.index;
 that.setData({
 clickIndex: index
 });
 // console.log(that.data.scrollLeftIndex);
 console.log('当前点击日期:',that.data.dateList[index].shortDateString); //当前点击的日期

 // const {
 // index
 // } = e.currentTarget.dataset;
 // this.setData({
 // clickIndex: index
 // });
 // console.log(this.data.dateList[index]);
 },
})
样式
.scroll-view {
 height: 200rpx;
 background-color: #313751;
 width: 100%;
 white-space: nowrap;
}
.item {
 height: 200rpx;
 display: inline-block;
}
.text-view {
 display: flex;
 align-items: center;
 justify-content: center;
 flex-direction: column;
 width: 100%;
 height: 100%;
 color: #fff;
}
.month {
 font-size: 30rpx;
 margin-top: 10rpx;
}
.week {
 font-size: 32rpx;
 margin-top: 10rpx;
}
.day {
 font-size: 32rpx;
 width: 60rpx;
 height: 60rpx;
 border-radius: 10rpx;
 text-align: center;
 line-height: 60rpx;
 margin-top: 20rpx;
}
/* 日期选中的样式 */
.day-active {
 background-color: #FFB400;
 color: #fff;
}
更多教程点击《Vue.js前端组件学习教程》,欢迎大家学习阅读。
关于vue.js组件的教程,请大家点击专题vue.js组件学习教程进行学习。
以上就是本文的全部内容,希望对大家的学习有所帮助,也希望大家多多支持脚本之家。